


Your First OpenAI API Undertaking in Python Step-By-Step
Picture by Editor | ChatGPT
In a current put up, I demonstrated learn how to arrange your first giant language fashions (LLMs) which can be downloaded and operating with Ollama, a user-friendly framework supported by a number of platforms for operating open fashions like Mistral, LlaMA, Gemma, and extra. Inside this mission, we additionally applied a light-weight REST API and net interface for user-model interplay, using FastAPI.
Again by common demand, we are going to now put collectively the same step-by-step article which is able to navigate you thru the method of making one other first-time mission to make use of specialised LLMs, this time utilizing the OpenAI API to entry state-of-the-art fashions like GPT-4 as a substitute of downloading and using native fashions in your machine.
Heat-Up Readings
To get acquainted or clean up with acquainted ideas and instruments used on this article, listed here are some advisable or associated readings:
And, in fact, when you haven’t learn the earlier article on this collection, Your First Native LLM API Undertaking in Python Step-By-Step, chances are you’ll wish to achieve this now.
Nonetheless with me? OK, let’s do it.
Step-by-Step Course of
On this tutorial, we are going to assume you’ve gotten Python 3.9 or later put in in your machine, and that you’ve got acquired a primary to intermediate understanding of the Python programming language. The code we are going to use may be applied inside a Python-friendly IDE like Visible Studio Code or comparable — please observe, as a result of requirement of utilizing a number of dependencies and the advisable use of a digital atmosphere, this might not be an appropriate mission to be run on a Google Colab occasion or comparable pocket book atmosphere within the cloud. Don’t fear, I’ll information you thru the entire crucial the setup steps.
Getting an OpenAI Key
To run your personal OpenAI API mission, you will want an API key. First, browse to the OpenAI web site and join or log in when you’ve got already registered for the OpenAI platform. In case you are signing up, you are able to do so together with your e mail deal with, Google, or Microsoft account. Then go to settings (gear icon on the top-right nook) and “Billing” on the left-hand facet menu. You must see one thing like this:
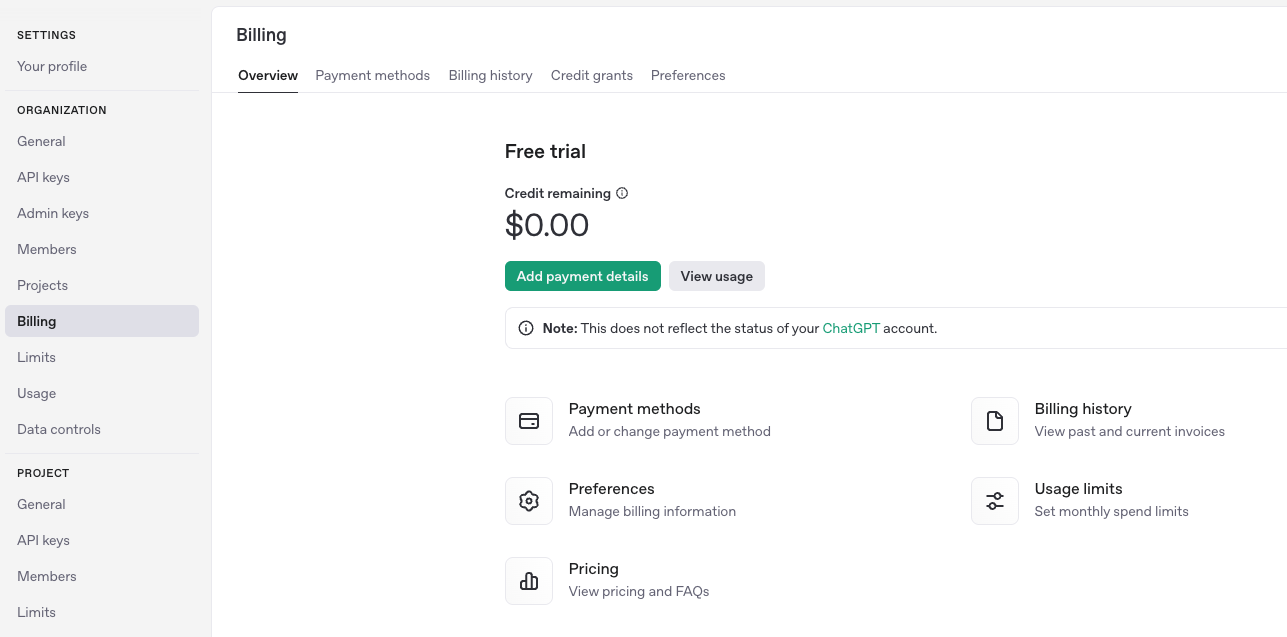
As of writing, getting dependable entry to trendy OpenAI fashions like GPT-4 requires a billing plan, both subscription or pay-as-you-go. In the course of the course of, you’ll be requested in your debit/bank card particulars and a billing deal with, and a easy account verification course of will observe.
Subsequent, go to the API keys web page and create a brand new API key by clicking + Create new secret key on the top-right nook. The generated key must be of the format sk-XXXXX, the place XXXXX is a protracted alphanumeric string which can additionally include some particular characters like dashes and underscorees. You’ll want to repeat and paste this API key later.
Setting Up a Python Undertaking and Digital Atmosphere
Assuming you’re utilizing VS Code (chances are you’ll have to take barely completely different actions if working with different IDEs), let’s create a brand new mission folder within the file listing on the left-hand facet, and name it openai_api_hello or comparable: as that is our first OpenAI API mission, the “hi there” as a part of the mission title stands for the ever-present “Whats up World”!
Contained in the folder, we are going to add two extra information: fundamental.py and necessities.txt. We are going to depart the Python file empty for now, and add this content material to the necessities.txt file:
fastapi
uvicorn
openai
python-dotenv
fastapi
uvicorn
openai
python–dotenv
These are the libraries and dependencies we might want to set up within the digital atmosphere the place the mission shall be run. Be sure to save the adjustments within the modified file.
Establishing a digital atmosphere is advisable when working with initiatives requiring a number of dependencies as a result of it isolates them, prevents conflicts amongst library variations, and retains some sense of order in your “growth ecosystem.” You may set it up by:
Opening the command palette by urgent Command + Shift + P.
Choosing Python:Create Atmosphere from the drop-down record, of manually typing it, then deciding on venv.
Chances are you’ll select between creating a brand new digital atmosphere or selecting an current one: we advocate creating it for a first-time mission like this. Then, select an appropriate Python model (I selected Python 3.11).
You must now be prompted to choose the necessities.txt created earlier and set up the listed dependencies. This is essential, as we are going to want FastAPI, Uvicorn, OpenAI, and Python-dotenv for our Python mission to work.
If the final step doesn’t work, attempt operating this within the IDE’s terminal:
pip set up fastapi uvicorn openai python-dotenv
pip set up fastapi uvicorn openai python–dotenv
Essential Python Program
Time to populate the empty fundamental.py file we created earlier than, by including the next code:
from fastapi import FastAPI, HTTPException
from pydantic import BaseModel
import os
from openai import OpenAI
from dotenv import load_dotenv
from dotenv import load_dotenv
import os
# IMPORTANT: PASTE YOUR OPENAI API KEY BETWEEN THE “” HERE:
shopper = OpenAI(api_key=”sk-…”)
app = FastAPI()
class ChatRequest(BaseModel):
message: str
@app.put up(“/chat”)
async def chat(request: ChatRequest):
attempt:
completion = shopper.chat.completions.create(
mannequin=”gpt-4″,
messages=[
{“role”: “system”, “content”: “You are a helpful assistant.”},
{“role”: “user”, “content”: request.message}
]
)
return {“response”: completion.decisions[0].message.content material}
besides Exception as e:
increase HTTPException(status_code=500, element=str(e))
@app.get(“/”)
def root():
return {“message”: “Whats up, World”}
1
2
3
4
5
6
7
8
9
10
11
12
13
14
15
16
17
18
19
20
21
22
23
24
25
26
27
28
29
30
31
32
33
34
from fastapi import FastAPI, HTTPException
from pydantic import BaseModel
import os
from openai import OpenAI
from dotenv import load_dotenv
from dotenv import load_dotenv
import os
# IMPORTANT: PASTE YOUR OPENAI API KEY BETWEEN THE “” HERE:
shopper = OpenAI(api_key=“sk-…”)
app = FastAPI()
class ChatRequest(BaseModel):
message: str
@app.put up(“/chat”)
async def chat(request: ChatRequest):
attempt:
completion = shopper.chat.completions.create(
mannequin=“gpt-4”,
messages=[
{“role”: “system”, “content”: “You are a helpful assistant.”},
{“role”: “user”, “content”: request.message}
]
)
return {“response”: completion.decisions[0].message.content material}
besides Exception as e:
increase HTTPException(status_code=500, element=str(e))
@app.get(“/”)
def root():
return {“message”: “Whats up, World”}
Earlier than going additional, let’s check out the completely different elements of the code. Belief me, it’s fairly easy:
First, the mandatory libraries and modules are imported, together with the os native library. We don’t want it on this model of the code, but when this primary try works, you may wish to come again to your Python code and accessing your API key saved in a further file inside your mission known as .venv that comprises it, as a substitute of immediately pasting the entire API key within the Python program. We are going to elaborate on this shortly.
Very importantly, on this line,
shopper = OpenAI(api_key=”sk-XXXXX”)
shopper = OpenAI(api_key=“sk-XXXXX”)
You have to paste your beforehand generated OpenAI API key, particularly changing the sk-XXXXX string together with your precise key, conserving the citation marks on each side. Alternatively, if you wish to have your API key saved in a separate file, create a file known as .venv in your mission folder, and add:
OPENAI_API_KEY=
OPENAI_API_KEY=<YOUR KEY GOES HERE>
To entry the important thing utilizing this strategy, change the next instruction:
shopper = OpenAI(api_key=”sk-XXXXX”)
shopper = OpenAI(api_key=“sk-XXXXX”)
With this one:
load_dotenv(dotenv_path=os.path.be a part of(os.path.dirname(__file__), “.env”))
api_key = os.getenv(“OPENAI_API_KEY”)
print(“Loaded API key:”, api_key) # Helpful for debugging and potential troubleshooting, take away if it really works.
if not api_key:
increase RuntimeError(“OPENAI_API_KEY not present in atmosphere variables”)
If you happen to simply determined to maintain your API key pasted within the Python file code, you don’t have to take the final couple of steps. Let’s have a look at extra elements of the code:
app = FastAPI()
class ChatRequest(BaseModel):
message: str
app = FastAPI()
class ChatRequest(BaseModel):
message: str
The primary instruction creates an occasion of FastAPI software based mostly on an internet API that serves requests. The second instruction defines a so-called Pydantic mannequin that FastAPI makes use of to validate and parse inputs or requests in a easy vogue, anticipating the physique of requests to be in JSON format. The message: str instruction provides a subject known as “message” to the physique of the request, with its worth being a string, the place the consumer immediate for the LLM shall be later specified.
The principle perform of this system is that this one:
@app.put up(“/chat”)
async def chat(request: ChatRequest):
(…)
@app.put up(“/chat”)
async def chat(request: ChatRequest):
(...)
That is the place the principle logic of the API is outlined, specifically by creating an occasion to entry the GPT-4 mannequin, sending inputs to it, and accumulating responses.
Operating and Testing the Undertaking
Save the Python file, and click on on the “Run” icon or run python fundamental.py within the terminal. Additionally, you will have to run the next command within the IDE terminal (for this, essential, ensure you are positioned in the fitting listing of your mission and the digital atmosphere is activated):
uvicorn fundamental:app –reload –port 8010
uvicorn fundamental:app —reload —port 8010
If you happen to see a sequence of ‘INF0’ messages being output like this, that’s a great signal and your FastAPI server is now operating:
INFO: Uvicorn operating on http://127.0.0.1:8010 (Press CTRL+C to stop)
INFO: Began reloader course of [98131] utilizing StatReload
INFO: Began server course of [98133]
INFO: Ready for software startup.
INFO: Utility startup full.
INFO: Uvicorn operating on http://127.0.0.1:8010 (Press CTRL+C to stop)
INFO: Began reloader course of [98131] utilizing StatReload
INFO: Began server course of [98133]
INFO: Ready for software startup.
INFO: Utility startup full.
The service is now accessible by way of http://127.0.0.1:8010/docs (right here we used port 8010, however ensure you are utilizing the fitting port for you). Open this URL in your browser, and if all the things went accurately, you’ll see a FastAPI Docs Net interface like this:
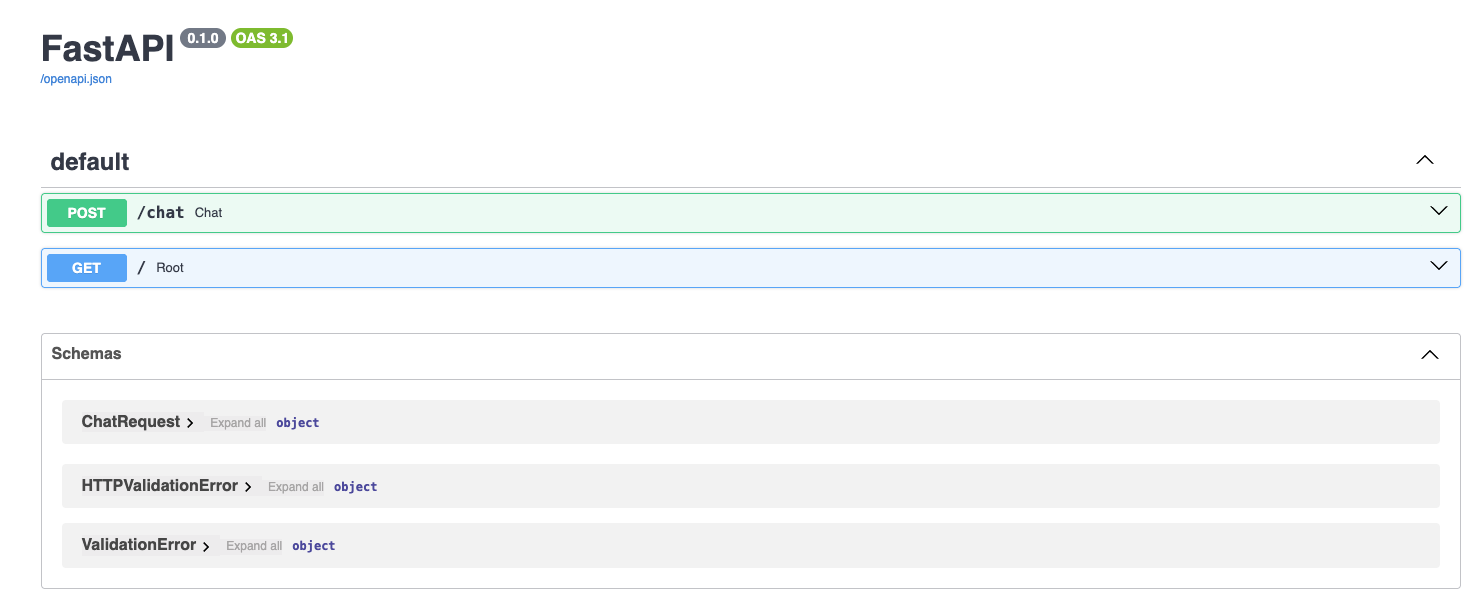
We’re about to essentially the most thrilling a part of the method: testing our API mission! Within the interface displayed, click on the arrow beside the POST/generate field to unfold it, and click on the “Attempt it out” button.
Right here, you possibly can enter a immediate of your option to ask GPT-4 a query. You have to do it in a devoted JSON-like parameter worth, as proven under, by changing the default immediate: “string”. As an example:
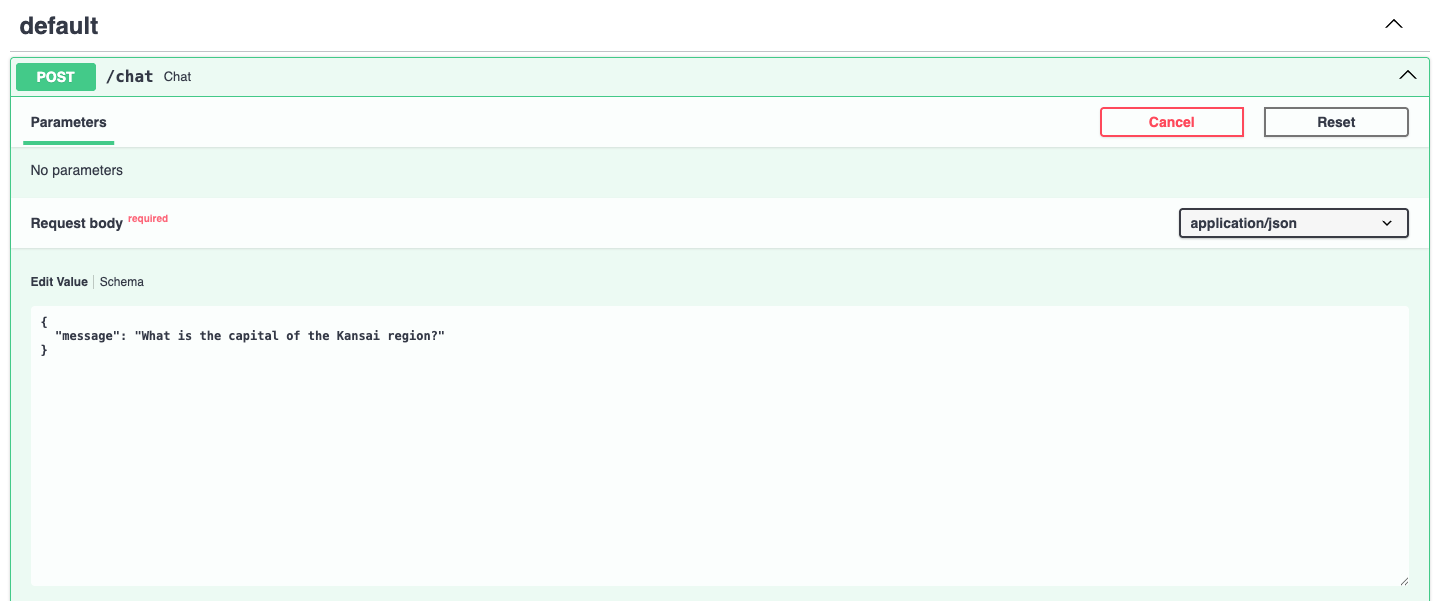
When you click on the “Execute” button, in just a few seconds chances are you’ll get the response by barely scrolling down:
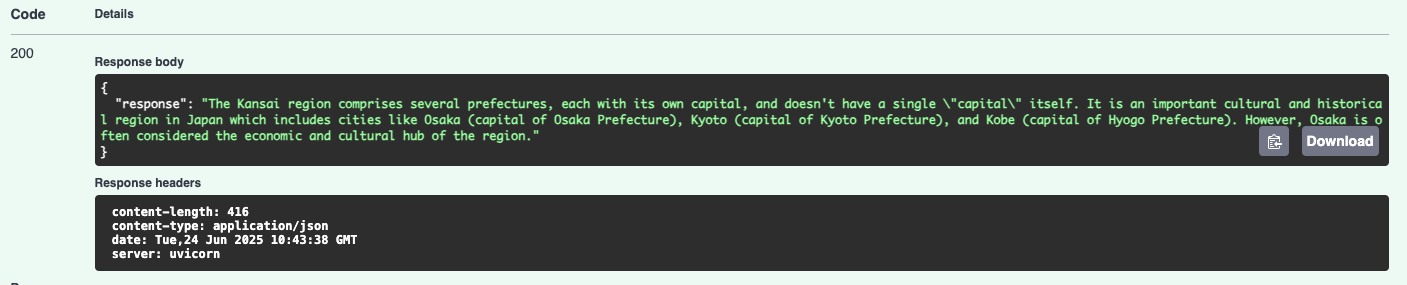
Properly carried out, your API mission is now beginning the dialog with OpenAI’s GPT-4 mannequin!
After this primary mission, chances are you’ll marvel what to do subsequent. Potential concepts for follow-up developments may embody including a frontend UI utilizing applied sciences like React or Vue, or HTML mixed with JavaScript, and even Streamlit. Enhancing error dealing with procedures is one other logical strategy, or making an attempt out different OpenAI fashions like GPT-3.5 or o3.
Concluding Remarks
This text illustrated in a step-by-step vogue learn how to arrange and run your first native OpenAI API Undertaking for utilizing OpenAI state-of-the-art fashions like GPT-4, based mostly on FastAPI for fast mannequin inference via a Net-based interface. If you happen to haven’t checked the associated tutorial on constructing your first native LLM mission (linked on the high of this text), don’t miss it!